

This article is the fourth part of my odoo javascript programming tutorial series. If you haven’t read the first to the third part of the series, I recommend reading those articles first. You should find the link to those articles at the bottom of this page.
In this part, I will discuss how to add and use attributes and perform ajax calls.
In general, there are 3 ways to write attributes, the first one is by writing them directly in the field, such as the invisible attribute in the code below.
<field name="partner_id" invisible="1" />
The second way is to insert the attribute in the attrs attribute, like in the code below.
<field name="partner_id" attrs="{'invisible': [('user_id','=',False)]}" />
While the third way is to insert the attribute in the options attribute as we have done in the second series.
<field name="field_one" widget="widget_one" options="{'step': 1000}"/>
As a study case, let’s add a new button in the widget that we’ve created since the first series with the code below.
<?xml version="1.0" encoding="UTF-8"?>
<template>

    <t t-name="WidgetOneTemplate">
        <div>
            <t t-if="widget.mode == 'edit' ">
                <div class="input-group">
                    <div class="input-group-prepend">
                        <button class="btn btn-danger btn-minus"> - </button>
                    </div>
                    <input type="text" class="form-control" t-att-value="formated_value" disabled="disabled" />
                    <div class="input-group-append">
                        <button class="btn btn-success btn-plus"> + </button>
                        <button class="btn btn-primary btn-copy"><i class="fa fa-copy"></i></button>
                        <!-- additional button in tutorial part four -->
                        <button class="btn btn-warning btn-dollar"><i class="fa fa-dollar"></i></button>
                    </div>
                </div>
            </t>
            <t t-if="widget.mode == 'readonly' ">
                <span t-esc="formated_value" />
            </t>
        </div>
    </t>

</template>
The form view will look like the image below.

Next let’s add an attribute to the field that uses the widget we’ve created, like in the code below.
<field name="field_one" widget="widget_one" options="{'step': 1000}" relatedModel="sale.order" />
In the code above I have added the relatedModel attribute with the value of sale.order, while the options attribute has existed since the second series. Then how to get the value of the relatedModel attribute if the user clicks on the button with btn-dollar class ?
First, we need to add a click event to the button with the btn-dollar class that we created earlier, this time I chose to use the method we discussed in the second series, instead of using the method we discussed in the third series.
events: { // list of event, like jquery event
    'click .btn-minus': 'btn_minus_action',
    'click .btn-plus': 'btn_plus_action',
    'click .btn-dollar': 'btn_dollar_action', // additional in tutorial part four
},
Meanwhile, to get the value of an attribute we can use the code below.
btn_dollar_action: function(){
    console.log(this.attrs.relatedModel)
},
Then what happens if we change the code above to this?
<field name="field_one" widget="widget_one" options="{'step': 1000}" relatedModel="sale.order" attrs="{'relatedAction': 'get_last_order_amount'}" />
To get the value of the relatedAction attribute above we can use the code below.
btn_dollar_action: function(){
    console.log(this.attrs.modifiers.relatedAction)
},
Actually if we write console.log() on the this variable like in the code below.
btn_dollar_action: function(){
    console.log(this)
},
We will see all the properties and values owned by the widget, including the value of the attrs property, which looks like the image below.
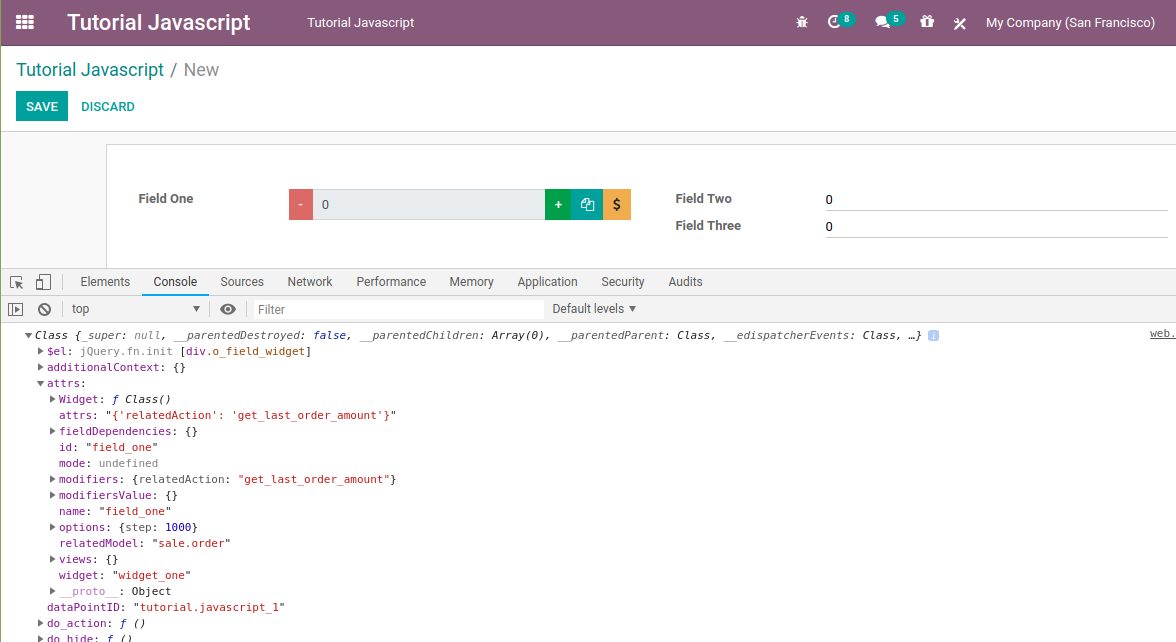
Therefore, to get the value of the step attribute we can also use the this.attrs.options.step code, instead of using the this.nodeOptions.step code as we did in the second part of the series.
Now we will discuss how to make an ajax call to the server from the widget that we have created.
But before writing the ajax code we need to determine whether we will call the action on the controller or the action on the model. Because the way is different. This time we will discuss how to call an action/method on a model first. For example, suppose that in the sale.order model we have a method like in the code below.
class SaleOrder(models.Model):
    _inherit = 'sale.order'

    def get_last_order_amount(self):
        print('get_last_order_amount=====called=======')
        print(self)
        return 1000
Please remember at the beginning of this article, we have written the field with some attributes like in the code below.
<field name="field_one" widget="widget_one" options="{'step': 1000}" relatedModel="sale.order" attrs="{'relatedAction': 'get_last_order_amount'}" />
We will use the relatedModel attribute and the relatedAction attribute above, so the widget can be used to dynamically get data from all models. For example, in another form, if we want the widget can get data from the purchase.order model, we can use code like this.
<field name="field_one" widget="widget_one" options="{'step': 1000}" relatedModel="purchase.order" attrs="{'relatedAction': 'get_last_order_amount'}" />
Of course we have to add the get_last_order_amount method in the purchase.order model first.
Ok. Now let’s write the ajax code that calls the action of a model when the user clicks on the button with the dollar icon.
btn_dollar_action: function(){
    var self = this;
    this._rpc({
        model: this.attrs.relatedModel,
        method: this.attrs.modifiers.relatedAction,
        args: [[]]
    }).then(function(result){
        self._setValue(result.toString());
    });
},
If you pay attention and you’ve read my article about How to Call Odoo API with PHP, then you will notice that the parameters passed to the _rpc method are very similar with parameters when we call the odoo external API. The value of the model property is the name of the model that we will call, while the value of the method property is the method name of the model. All public methods of a model either built-in odoo method like read, search, search_name, create etc or public methods that we added, in this case the get_last_order_amount method can be called via ajax.
This is a screenshot after the user clicks the button with the dollar icon.
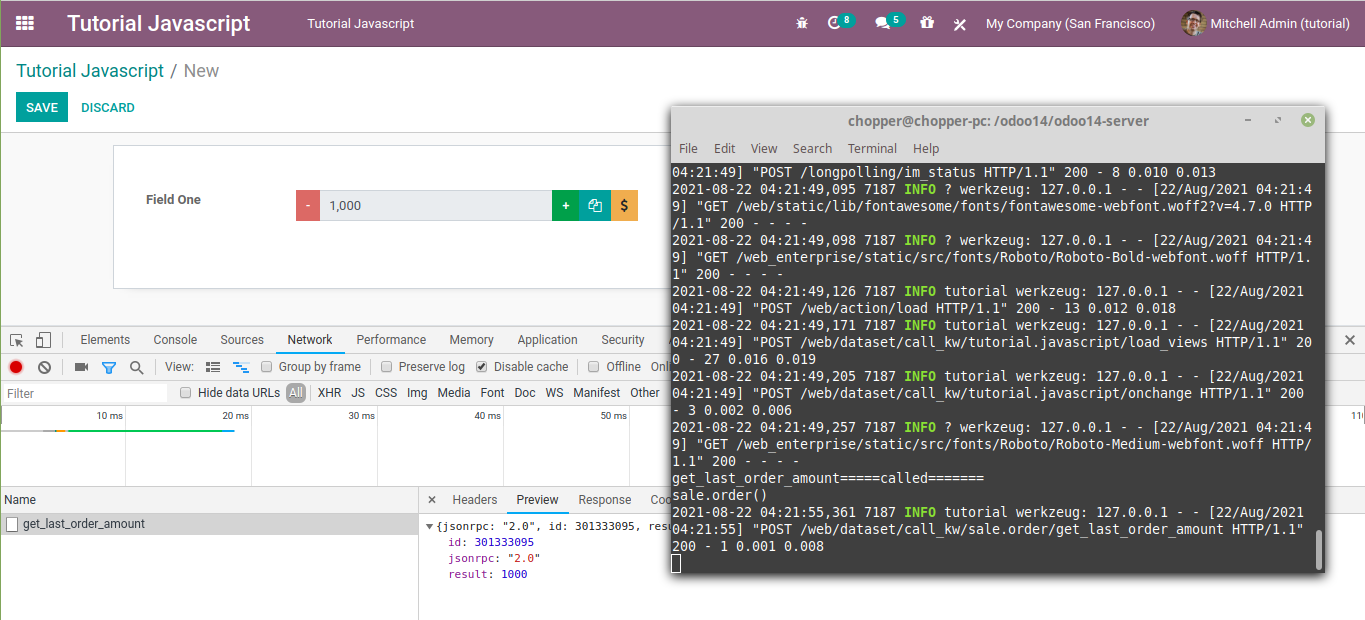
From the picture above, we can see that ajax has been executed properly, judging by the logs in the google chrome developer tool, the logs on my computer terminal, and the value of the widget that has been replaced with the value from the server.
Next we will discuss how to write the args property. In the above example, the value of the first index of the args property is an empty array, therefore, in python if we call the print(self) code odoo will display an empty model as well, please take a look at my terminal above. Then, suppose in my database I have a sales order with the id of 1 and 2 then I change the widget code to this.
btn_dollar_action: function(){
    var self = this;
    this._rpc({
        model: this.attrs.relatedModel,
        method: this.attrs.modifiers.relatedAction,
        args: [[1,2]]
    }).then(function(result){
        self._setValue(result.toString());
    });
},
And change the python code to this.
def get_last_order_amount(self):
    print('get_last_order_amount=====called=======')
    print(self)
    value = 0
    for order in self:
        print('oder_id====', order.id)
        print('customer====', order.partner_id.name)
        print('amount====', order.amount_total)
        value += order.amount_total
    return value
Automatically the self object will contain information from the sales order model with the id of 1 and 2. We don’t need to search them manually with the search or browse methods to get the data of the sales order with the id 1 and 2.

Then, what we need to do if we add some positioned arguments to the method above? Like in the code below?
def get_last_order_amount(self, value_1, value_2):
    print('get_last_order_amount=====called=======')
    print(self)
    print(value_1)
    print(value_2)
    value = 0
    for order in self:
        print('oder_id====', order.id)
        print('customer====', order.partner_id.name)
        print('amount====', order.amount_total)
        value += order.amount_total
    return value
To fill in the positioned arguments, in the above example the value_1 and value_2 arguments, we can write them sequentially after the array parameter containing the id of the model. Like in the code below.
btn_dollar_action: function(){
    var self = this;
    this._rpc({
        model: this.attrs.relatedModel,
        method: this.attrs.modifiers.relatedAction,
        args: [[1,2],100,200]
    }).then(function(result){
        self._setValue(result.toString());
    });
},
As we already know, the positioned argument must always be filled with a value, because it doesn’t have a default value, otherwise an error will occur. Then what we need to do, if the method that we call has some positioned arguments and some default value argument (I usually call this argument as a keyword argument), like in the code below?
def get_last_order_amount(self, value_1, value_2, value_3=3, value_4=4):
    print('get_last_order_amount=====called=======')
    print(self)
    print(value_1)
    print(value_2)
    print(value_3)
    print(value_4)
    value = 0
    for order in self:
        print('oder_id====', order.id)
        print('customer====', order.partner_id.name)
        print('amount====', order.amount_total)
        value += order.amount_total
    return value
If you want to send all values for all arguments, you just need to write the values in order like in the code below.
btn_dollar_action: function(){
    var self = this;
    this._rpc({
        model: this.attrs.relatedModel,
        method: this.attrs.modifiers.relatedAction,
        args: [[1,2],100,200,300,400]
    }).then(function(result){
        self._setValue(result.toString());
    });
},
But if you only want to fill in the value of a certain keyword argument, you have to write it in the kwargs property, like in the code below.
btn_dollar_action: function(){
    var self = this;
    this._rpc({
        model: this.attrs.relatedModel,
        method: this.attrs.modifiers.relatedAction,
        args: [[1,2],100,200],
        kwargs: {value_4: 4000}
    }).then(function(result){
        self._setValue(result.toString());
    });
},
Now we will discuss how to make an ajax call to the odoo controller.
Unlike the ajax call to the model, to perform an ajax to the controller we cannot use the this._rpc method, but we can use the rpc method of the session object. Therefore we need to import it first, with the code below.
var session = require('web.session');
You need to remember, when importing the web.session object, we must use lowercase s instead of uppercase S, because odoo also has web.Session object with uppercase S. Then suppose we have a controller like the code below.
# -*- coding: utf-8 -*-

from odoo import http
from odoo.http import request


class TutorialController(http.Controller):

    @http.route(['/tutorial/amount'], type='json', auth='user')
    def get_amount(self, **kwargs):
        print('Controller=====/tutorial/amount=====called')
        print(kwargs)
        return 20000
To perform an ajax call to the controller from the widget, we can use the code below.
btn_dollar_action: function(){
    var self = this;
    session.rpc(
        '/tutorial/amount',
        {
            'oder': [1,2]
        }
    ).then(function(result){
        self._setValue(result.toString());
    });
},
The result will look like this.

When we perform an ajax call to the controller we have to do everything manually. For example, if we want to know who own the sales order with id 1 and 2, then we have to call the search or browse methods on the sale.order model manually. If we perform an ajax call to the model it will run automatically. But the ajax call to the controller also has its own advantages, for example, we can use the sudo method to bypass the access rights. Therefore, if the user does not have the Read access rights to the sale.order model, we can use the sudo method, so the process can still running and the user can get the data that we provide. Meanwhile, if we perform an ajax call to the model and the user does not have the Read access rights on the model an error will occur. So choose and use as needed.
Download the Source Code