

In the first part of the odoo javascript programming tutorial series, I have discussed how to create a simple widget, a widget that only displays a short message to the user. In this second part, I will discuss how to add logic to the widget that we have created in the first part.
To follow this tutorial make sure you have created a field with the type of integer like in the code below.
field_one = fields.Integer('Field One')
When you create a field with the type of integer, when you add it to the xml/view file, odoo will automatically render the value of that field in an input element in edit mode, so user can change the value directly on the input element earlier. In this tutorial, we will try to change the appearance of the integer field above, which initially can be changed freely by the user, to be a little more limited, by adding 2 buttons. The – buttons to decrease the value and the + buttons to increase the value. So if the user wants to change the integer field value, he must click the – button or the + button, it can no longer be typed freely.
First, let’s change the WidgetOneTemplate template from the first part of this tutorial series to display two buttons ( – and + ) and an input field that disabled in edit mode. Then only displays the value in readonly mode, without buttons and input field.
<?xml version="1.0" encoding="UTF-8"?>
<template>

    <t t-name="WidgetOneTemplate">
        <div>
            <t t-if="widget.mode == 'edit' ">
                <div class="input-group">
                    <div class="input-group-prepend">
                        <button class="btn btn-danger btn-minus"> - </button>
                    </div>
                    <input type="text" class="form-control" t-att-value="widget.value" disabled="disabled" />
                    <div class="input-group-append">
                        <button class="btn btn-success btn-plus"> + </button>
                    </div>
                </div>
            </t>
            <t t-if="widget.mode == 'readonly' ">
                <span t-esc="widget.value" />
            </t>
        </div>
    </t>

</template>
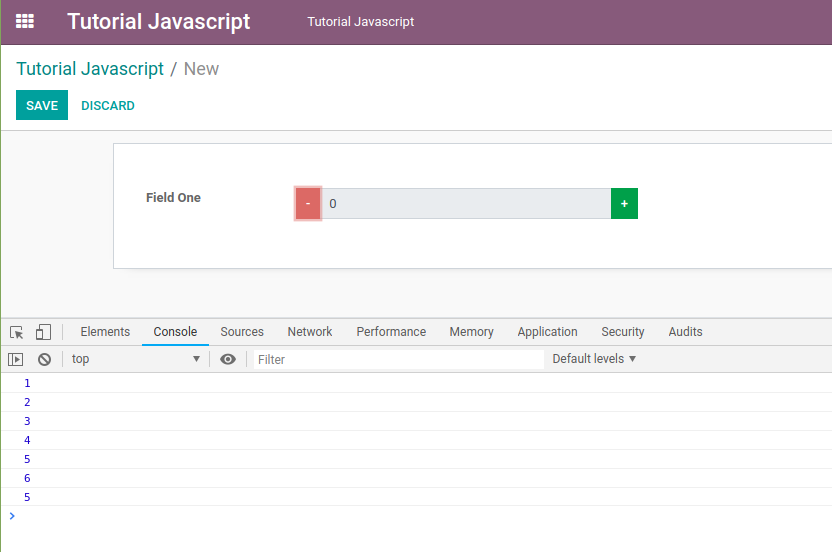
In edit mode it will look like the image below.

Then in the widget_one.js file let’s add an event for each button, like in the code below.
var WidgetOne = AbstractField.extend({
    template: 'WidgetOneTemplate', // fill with the template name that will be rendered by odoo
    events: { // list of event, like jquery event
        'click .btn-minus': 'btn_minus_action',
        'click .btn-plus': 'btn_plus_action',
    },
    btn_minus_action: function(){
        var new_value = this.value - 1;
        this._setValue(new_value.toString());
        console.log(this.value);
    },
    btn_plus_action: function(){
        var new_value = this.value + 1;
        this._setValue(new_value.toString());
        console.log(this.value);
    },
});
The events in odoo are almost the same as the events in jquery, except that they are written in reverse. In jquery if we want to write the click event on a button with the btn-minus class we can write it like this.
$('.btn-minus.').click(btn_minus_action);
Actually, we can use the jquery code above in the odoo widget, but for now, it is better if we use the first code, the use of jquery in the odoo widget will be discussed at a later time if there is an opportunity.
To change the value of a field we can use the this._setValue(new_value) method, but there are a few things that you need to pay attention regarding the data type of this new_value variable, depending on the data type of the fields that use the widget that we create. For example, in an integer field the variable that we pass to the this._setValue() method must be a string. If it is a number it will cause an error. Strange ? Not really. Because by default we can input the field with the type of integer with a value like 123,456.78 which of course is a string. And odoo can still process that value as a number. Because in shadow, odoo will parse the new_value variable that in the form of a string to a number so it can be processed in addition, subtraction, etc. operations, even though the view display 123,456.78 which of course is not a valid number value in javascript. Therefore, we have to change the new_value variable from number data type to string data type with the toString() method.
Restart your odoo service, then refresh the browser, let’s see the logic that we added has been successfully executed or not.
It is not working yet. On the console the value has been changed but on the user interface the value is still zero. Why ?
It turns out that when the value of a field has been changed, the user interface is not automatically re-rendered by odoo. In order for the user interface to be re-rendered when the value of a field changes, we must override the _render, or the _renderEdit methods if you want to manage the display logic between the edit and readonly mode through javascript code. But, because in this tutorial the display logic between the edit and the readonly mode is managed in the xml file with the t-if attribute, we will override the _render method only.
There are several ways to change the appearance of the user interface, the easiest way is to use the qweb. So let’s import the qweb then override the _render method like in the code below.
odoo.define('tutorial_javascript.widget_one', function (require) {
"use strict";
    // import the required object to create a widget
    var AbstractField = require('web.AbstractField');
    var FieldRegistry = require('web.field_registry');

    // import qweb to render a view
    var core = require('web.core');
    var qweb = core.qweb;

    // create an object with any name
    // don't forget to extend to the web.AbstractField object or its child
    var WidgetOne = AbstractField.extend({
        template: 'WidgetOneTemplate', // fill with the template name that will be rendered by odoo
        events: { // list of event, like jquery event
            'click .btn-minus': 'btn_minus_action',
            'click .btn-plus': 'btn_plus_action',
        },
        btn_minus_action: function(){
            var new_value = this.value - 1;
            this._setValue(new_value.toString());
        },
        btn_plus_action: function(){
            var new_value = this.value + 1;
            this._setValue(new_value.toString());
        },
        _render: function () {
            // re-render the view if the field value is changed
            console.log(this.value);
            this.$el.html($(qweb.render(this.template, {'widget': this})));
        },
    });

    // register the widget to web.field_registry object
    // so we can use our widget in odoo's view/xml file
    // with the code like below
    // <field name="field_one" widget="widget_one" />
    // the 'widget_one' name is up to you, as long as it's always connected/without spaces
    FieldRegistry.add('widget_one', WidgetOne);

    // return the widget object
    // so it can be inherited or overridden by another module
    return WidgetOne;

});
The first parameter that we have to pass in the qweb.render method is the name of the template to be rendered. Meanwhile, the second parameter is the object/data that we want to display. In the second parameter, the key of the object we set to widget because in the WidgetOneTemplate template we use the widget.value code to display the value of the field that uses the widget that we create. We can change the name of this key, for example, like in the code below.
this.$el.html($(qweb.render(this.template, {'data': this})));
But in the WidgetOneTemplate template we also have to change the code to data.value, otherwise it will cause an error.
Restart your odoo service, then refresh your browser. Now let’s see the values of the fields have been displayed correctly or not.

Oh, it turns out that the value is displayed correctly. Now let’s click the Save button, whether the value is stored correctly or not.

Currently, the value of the field that use the widget_one widget will increase by 1 if the user click the + button and will decrease by 1 if the user click the – button. Then what will we do if the user wants this addition or subtraction value can be adjusted, for example in form A the addition or subtraction value is 1000 while in form B the user wants the addition or subtraction value to be 3 ?
We can use the attrs, options, or context attributes, which are usually included when we write a field in the xml/view file. But in this tutorial we will use the options attribute to detect whether the user configure the addition or subtraction value or not. If the user configure it in the options attribute like in the code below.
<field name="field_one" widget="widget_one" options="{'step': 1000}"/>
We will make the value of the field that uses the widget_one widget will be increased or decreased by the step value configured by the user in the xml file, which is 1000. But if the user does not configure it, like in the code below.
<field name="field_one" widget="widget_one"/>
Then the value of the field that uses the widget_one widget will be increased or decreased by 1.
We can save the step value as a property of the widget, then we can use the init method which will be called first automatically by odoo to detect whether the user configures the step value or not.
odoo.define('tutorial_javascript.widget_one', function (require) {
"use strict";
    // import the required object to create a widget
    var AbstractField = require('web.AbstractField');
    var FieldRegistry = require('web.field_registry');


    // import qweb to render a view
    var core = require('web.core');
    var qweb = core.qweb;

    // create an object with any name
    // don't forget to extend to the web.AbstractField object or its child
    var WidgetOne = AbstractField.extend({
        step: 1, // default value, if user not configure it in xml file
        template: 'WidgetOneTemplate', // fill with the template name that will be rendered by odoo
        events: { // list of event, like jquery event
            'click .btn-minus': 'btn_minus_action',
            'click .btn-plus': 'btn_plus_action',
        },
        init: function () {
            // the 'init' method is called first
            this._super.apply(this, arguments);
            if(this.nodeOptions.step){
                // if user configure the 'step' value in xml file
                // change the default value to user desired value
                this.step = this.nodeOptions.step;
            }
        },
        btn_minus_action: function(){
            var new_value = this.value - this.step;
            this._setValue(new_value.toString());
        },
        btn_plus_action: function(){
            var new_value = this.value + this.step;
            this._setValue(new_value.toString());
        },
        _render: function () {
            // re-render the view if the field value is changed
            console.log(this.value);
            this.$el.html($(qweb.render(this.template, {'widget': this})));
        },
    });

    // register the widget to web.field_registry object
    // so we can use our widget in odoo's view/xml file
    // with the code like below
    // <field name="field_one" widget="widget_one" />
    // the 'widget_one' name is up to you, as long as it's always connected/without spaces
    FieldRegistry.add('widget_one', WidgetOne);

    // return the widget object
    // so it can be inherited or overridden by another module
    return WidgetOne;

});
Now if the user configures the step value to 1000 in the xml file in the options attribute, the field value will be increased or decreased by 1000, like in the image below.

Then what if we want to add the thousands separator ? To format currency ?
We can use the web.field_utils object to format currencies. Therefore, let’s import it first.
var field_utils = require('web.field_utils');
Then let’s change the _render method to include the formatted value with a thousand separator.
_render: function () {
    // re-render the view if the field value is changed
    // format the value to include the thousand separator
    var formated_value = field_utils.format[this.formatType](this.value);
    this.$el.html($(qweb.render(this.template, {'widget': this, 'formated_value': formated_value})));
},
Then let’s modify the WidgetOneTemplate template to display the formatted value with a thousand separator, instead of the original value.
<?xml version="1.0" encoding="UTF-8"?>
<template>

    <t t-name="WidgetOneTemplate">
        <div>
            <t t-if="widget.mode == 'edit' ">
                <div class="input-group">
                    <div class="input-group-prepend">
                        <button class="btn btn-danger btn-minus"> - </button>
                    </div>
                    <input type="text" class="form-control" t-att-value="formated_value" disabled="disabled" />
                    <div class="input-group-append">
                        <button class="btn btn-success btn-plus"> + </button>
                    </div>
                </div>
            </t>
            <t t-if="widget.mode == 'readonly' ">
                <span t-esc="formated_value" />
            </t>
        </div>
    </t>

</template>
The result will be like the image below.

OK. This is the second part of the odoo javascript tutorial series in my blog. Hopefully, this is useful for you.
Download the Source Code
4 Replies to “Odoo JavaScript Programming Tutorial (Part Two) – Widget Logic”
Hello, thank you for this, its very helpful. However when i don’t edit some of the fields with the javascript widgets, they leave a blank after saving. Do you know how i can make the default value appear on saving if the widgets aren’t used for example it shows 0.00 if i haven’t edited that field.
do you have tried to add the default=0 attribute at your field in python code ?
Love you !! Great Tutorial ….
excellent