

ir.actions.act_window is the most used action when we create an applications in the Odoo ecosystem. If we call this action, Odoo will render the view of the model, so the user can perform some CRUD operations on the model. The interesting part is, we don’t need to create a route, a controller, or the javascript code if we want to create an ajax based CRUD page. Even, we can ignore the view completely. With just a model, a permission, an action window, and a menuitem we can create a CRUD application. The route, the controller, the javascript code, and the view will be handled by Odoo automatically.
How to create and call the ir.actions.act_window
There are several ways that we can use to create and call the ir.actions.act_window, the first is to write it in an xml file, then connect it with a menuitem. For example, suppose we have a model like the code below.
# -*- coding: utf-8 -*-
from odoo import api, fields, models, exceptions, _

class ModelOne(models.Model):
    _name = 'model.one'
    _description = 'Model One'

    name = fields.Char()
    description = fields.Text()
    detail_ids = fields.One2many('model.one.detail', 'header_id')

class ModelOneDetail(models.Model):
    _name = 'model.one.detail'
    _description = 'Model One Detail'

    name = fields.Char()
    value = fields.Float()
    header_id = fields.Many2one('model.one')
After we create the access right for the models above (if you have trouble creating the access right please download the source code at the end of this article), we can create the ir.actions.act_window by creating a record, by writing an xml file with the record tag.
In Odoo, the record tag is used to add a row/record/data to a certain table/model when we install/upgrade a module. This is an example of how to add a record by using the record tag in an xml file.
<record id="id_or_primary_key" model="model_name">
	<!-- field list -->
    <field name="field_one">value_one</field>
    <field name="field_two">value_two</field>
</record>
-
id
id is any text which must be unique. In one module/addon we cannot create two id with the same name, just suppose the id like the primary key in the database. We can write an id with any character as long as it doesn’t contain spaces. Later we can use the id in another xml file or in python code for data manipulation.
-
model
model is the table where the data/record will be stored. id and model are mandatory, we must write them.
-
field lists
field lists is a list of fields/columns of the model/table and their values. This is optional, depending on the model we are going to. If the field in the model is marked as required we must write it, if not it’s up to you. In the ir.actions.act_window model the only field marked as required is the res_model field. So we can create a ir.actions.act_window record with the code below.
<record id="action_model_one_1" model="ir.actions.act_window">
    <field name="res_model">model.one</field>
</record>
The code above is the minimal code that we can write if we want to create an ir.actions.act_window in Odoo v15 with the record tag in the xml file. Please pay attention to the res_model field. If the ir.actions.act_window above is called, Odoo will automatically display the views associated with the model.one model, so the user can perform CRUD operations on that model.
Then we can connect the ir.actions.act_window we created above with a menuitem, by entering the id of the ir.actions.act_window above as the value of the action field of the menuitem, like in the code below.
<menuitem id="menu_model_one_1"
    name="Menu 1"
    action="action_model_one_1"
    parent="menu_model_one_root" />
If the ir.actions.act_window is written in a different module/addon, we must write the module/addon name before the id of the ir.actions.act_window, like module_one.action_model_one_1.
Then we just need to install the module that we have created. This is a screenshot of Menu 1 calling the ir.actions.act_window with id of action_model_one_1 above.

The image above is the default view of the model.one, because we haven’t created any views for that model. I’ll cover how to configure the view of ir.actions.act_window later.
Aside from using the record tag in the xml file, we can also create the ir.actions.act_window with the csv file. This method is rarely used, so you can ignore it. I wrote this method here just as additional info.
Create a file with the ir.actions.act_window.csv as the file name. Please pay attention, the file name must be the same, we can not use other text as the file name. The file name has the same function as the model attribute if we use the record tag in the xml file. Then write the field names that we will use on the first line, like the code below.
id,name,res_model
Then add the records starting from the second line and so on. Here is the complete code.
id,name,res_model
action_model_one_2,Action From CSV,model.one
In the code above I added the name field to differentiate it from the ir.actions.act_window that we created with the xml file. Then we just need to connect the ir.actions.act_window above with a menuitem. Actually, we can also create a menuitem with a csv file, but I’m lazy to do it, please try it yourself 🙂 This time I will choose to create a menuitem with an xml file, please take a look at the code below.
<menuitem id="menu_model_one_2"
    name="Menu 2"
    action="action_model_one_2"
    parent="menu_model_one_root" />
This is the view when we enter the Menu 2. Please pay attention to the ir.actions.act_window name in the breadcrumb section and compare it to the Menu 1.

We can also create and call the ir.actions.act_window in python and javascript files. But this method is more complex, so I’ll cover it at the end of this article.
How to configure the view of ir.actions.act_window
There are several fields from the ir.actions.act_window model that can be used to configure the ir.actions.act_window view. The first one is the target field. These are some options that we can use with the target field.
-
current
This option is the default option. If we call the ir.actions.act_window using this option with the menuitem, the views including the breadcrumb will be replaced. But, if we call it in python, the views will be replaced except for the breadcrumb, so we can return to the previous view by clicking the link on the breadcrumb.
-
new
This option is used if we want to display the view in a modal. If we call the ir.actions.act_window with this option, the new view will be displayed on top of the old view, and the breadcrumb also not changed. But, with this option, we can not change the view mode, for example from tree/list view to form view. Here is the sample code and how it will look like.
		<record id="action_model_one_new_window" model="ir.actions.act_window">
            <field name="name">Model One In Modal</field>
            <field name="res_model">model.one</field>
            <field name="target">new</field>
        </record>
-
inline
If we call the ir.actions.act_window with this option, the breadcrumb, the search view, the save button, the edit button, and the discard button will disappear. At first glance, this option seems useless. I’ve never created the ir.actions.act_window with this option before. But, this option is used when we open the Settings >> General Settings menu. On that menu, the Save button and the Edit button are still visible because the form view adds the buttons manually. Here is the sample code and how it will look like.
        <record id="action_model_one_inline" model="ir.actions.act_window">
            <field name="name">Model One Inline</field>
            <field name="res_model">model.one</field>
            <field name="target">inline</field>
        </record>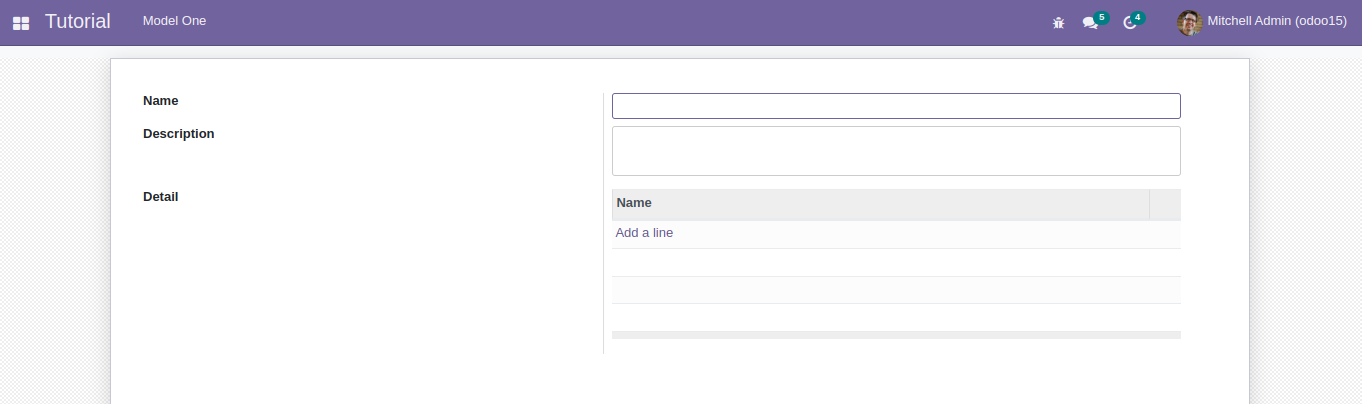
-
fullscreen
If we call the ir.actions.act_window with this option, the navbar will be hidden, so we can’t access the menus or Log Out button. Here is the sample code and how it will look like.
Model One Fullscreen model.one fullscreen 
-
main
If we call the ir.actions.act_window with this option, the breadcrumb will be replaced. We can see the difference between this option and the current option if the ir.actions.act_window with this option is called by javascript or python code only. If called with the menuitem it will make no difference at all. I will demonstrate it at the end of this article. Here is the sample code.
        <record id="action_model_one_main" model="ir.actions.act_window">
            <field name="name">Model One Main</field>
            <field name="res_model">model.one</field>
            <field name="target">main</field>
        </record>
The next field from the ir.actions.act_window model that can be used to configure the view is the view_mode. This field has 7 options that can be used alone or combined with other options, by separating them with commas. The options are: tree, form, graph, pivot, calendar, gantt, and kanban. By default the value of this option is tree,form. This means, we can switch the views from the tree/list view to the form view.
These are some sample codes of how to use the option.
<record id="action_model_one_tree_view_only" model="ir.actions.act_window">
    <field name="name">Model One Tree</field>
    <field name="res_model">model.one</field>
    <field name="view_mode">tree</field>
</record>

<record id="action_model_one_tree_kanban" model="ir.actions.act_window">
    <field name="name">Model One Kanban</field>
    <field name="res_model">model.one</field>
    <field name="view_mode">kanban,tree,form</field>
</record>
Please remember, not all options from the view_mode field above can be used for all models. Some options sometimes require some fields with certain names to be present in the model, for example, if we want to use the calendar option the model must have the date_start and the date_stop fields.
The next field from the ir.actions.act_window model that can be used to configure the view is the view_id field. This field is used to decide which view must be rendered if a model has multiple views of the same type. As an example, suppose we have a model like the code below.
# -*- coding: utf-8 -*-
from odoo import api, fields, models, exceptions, _

class ModelTwo(models.Model):
    _name = 'model.two'
    _description = 'Model Two'

    name = fields.Char()
    status = fields.Selection([
        ('new', 'New'),
        ('confirmed', 'Confirmed'),
        ('closed', 'Closed')
    ], default='new')
    description = fields.Text()
Then assume the model above has views like the code below.
<record id="model_two_tree_view_1" model="ir.ui.view">
    <field name="name">model_two_tree_view_1</field>
    <field name="model">model.two</field>
    <field name="priority">1</field>
    <field name="arch" type="xml">
        <tree>
            <field name="name" />
            <field name="status" />
        </tree>
    </field>
</record>

<record id="model_two_tree_view_2" model="ir.ui.view">
    <field name="name">model_two_tree_view_2</field>
    <field name="model">model.two</field>
    <field name="priority">2</field>
    <field name="arch" type="xml">
        <tree>
            <field name="name" />
            <field name="description" />
        </tree>
    </field>
</record>

<record id="model_two_kanban_view_1" model="ir.ui.view">
    <field name="name">model_two_kanban_view_1</field>
    <field name="model">model.two</field>
    <field name="priority">1</field>
    <field name="arch" type="xml">
        <kanban>
            <field name="name"/>
            <field name="status"/>
            <templates>
                <t t-name="kanban-box">
                    <div t-attf-class="oe_kanban_card oe_kanban_global_click">
                        <div class="o_kanban_record_top mb16">
                            <div class="o_kanban_record_headings mt4">
                                <strong class="o_kanban_record_title"><span><t t-esc="record.name.value"/></span></strong>
                            </div>
                        </div>
                        <div class="o_kanban_record_bottom">
                            <div class="oe_kanban_bottom_right">
                                <field name="status" widget="label_selection" />
                            </div>
                        </div>
                    </div>
                </t>
            </templates>
        </kanban>
    </field>
</record>

<record id="model_two_kanban_view_2" model="ir.ui.view">
    <field name="name">model_two_kanban_view_2</field>
    <field name="model">model.two</field>
    <field name="priority">2</field>
    <field name="arch" type="xml">
        <kanban>
            <field name="name"/>
            <field name="description"/>
            <templates>
                <t t-name="kanban-box">
                    <div t-attf-class="oe_kanban_card oe_kanban_global_click">
                        <div class="o_kanban_record_top mb16">
                            <div class="o_kanban_record_headings mt4">
                                <strong class="o_kanban_record_title"><span><t t-esc="record.name.value"/></span></strong>
                            </div>
                        </div>
                        <div class="o_kanban_record_bottom">
                            <div class="oe_kanban_bottom_left">
                                <field name="description" />
                            </div>
                        </div>
                    </div>
                </t>
            </templates>
        </kanban>
    </field>
</record>

<record id="model_two_form_view_1" model="ir.ui.view">
    <field name="name">model_two_form_view_1</field>
    <field name="model">model.two</field>
    <field name="priority">1</field>
    <field name="arch" type="xml">
        <form>
            <sheet>
                <group>
                    <field name="name" />
                    <field name="status" />
                </group>
            </sheet>
        </form>
    </field>
</record>

<record id="model_two_form_view_2" model="ir.ui.view">
    <field name="name">model_two_form_view_2</field>
    <field name="model">model.two</field>
    <field name="priority">2</field>
    <field name="arch" type="xml">
        <form>
            <sheet>
                <group>
                    <field name="name" />
                    <field name="description" />
                </group>
            </sheet>
        </form>
    </field>
</record>
The model.two above has 2 tree/list views, 2 kanban views and 2 form views. The first tree/list view only displays the name and the status field, while the second tree/list view only displays the name and the description field. Likewise with its kanban and form view.
By default, Odoo will display the view that has the smallest priority value or the view that is the earliest stored in the database. Therefore the tree/list view with the model_two_tree_view_1 id will be displayed, so the user can see the name and the status field only.
If we want to display the data with view that has the model_two_tree_view_2 id, we can use the view_id field from the ir.actions.act_window model. Here is an example of how to do it.
<record id="action_model_two_with_view_id_1" model="ir.actions.act_window">
    <field name="res_model">model.two</field>
    <field name="view_id" ref="model_two_tree_view_2"/>
</record>
With this, we can see the description field in the tree view.
Unfortunately the view_id field has some drawbacks. The first is: we can include one view only with this option. From the code above we have no control over which form view Odoo will render, because we fill the view_id option with the view from the tree/list view only (model_two_tree_view_2). So the form view that has the smallest priority value will be rendered, it is the form view with the model_two_form_view_1 id, so the user can not see the description field in the form view.
The second drawback is: Odoo will ignore the order of the view_mode option, as an example suppose we have a code like below.
<record id="action_model_two_with_view_id_3" model="ir.actions.act_window">
    <field name="res_model">model.two</field>
    <field name="view_mode">tree,kanban,form</field>
    <field name="view_id" ref="model_two_kanban_view_2"/>
</record>
From the code above, based on the view_mode option, the tree/list view should be rendered first, then the user can open the kanban view or the form view manually. But since we added the view_id option which refers to a kanban view, the kanban view will be rendered first, ignoring the order of the view_mode option. So if we have a code like below.
<record id="action_model_two_with_view_id_2" model="ir.actions.act_window">
    <field name="res_model">model.two</field>
    <field name="view_mode">tree,kanban,form</field>
    <field name="view_id" ref="model_two_form_view_2"/>
</record>
When the ir.actions.act_window above is called, we will be confronted with a form view immediately, without being able to switch to the kanban or the tree view.
If we want better control, we can use another field, it is the view_ids field.
With the view_ids field we can configure which views should be rendered more freely. The view_ids field actually has the One2many relation with the ir.actions.act_window.view model, so we can fill the view_ids field with the code like below.
<record id="action_model_two_with_view_ids" model="ir.actions.act_window">
    <field name="res_model">model.two</field>
    <field name="view_mode">kanban,tree,form</field>
</record>

<record id="action_model_two_with_view_ids_tree_view" model="ir.actions.act_window.view">
    <field name="act_window_id" ref="action_model_two_with_view_ids" />
    <field name="view_id" ref="model_two_tree_view_2"/>
    <field name="view_mode">tree</field>
    <field name="sequence">2</field>
</record>

<record id="action_model_two_with_view_ids_kanban_view" model="ir.actions.act_window.view">
    <field name="act_window_id" ref="action_model_two_with_view_ids" />
    <field name="view_id" ref="model_two_kanban_view_2"/>
    <field name="view_mode">kanban</field>
    <field name="sequence">1</field>
</record>

<record id="action_model_two_with_view_ids_form_view" model="ir.actions.act_window.view">
    <field name="act_window_id" ref="action_model_two_with_view_ids" />
    <field name="view_id" ref="model_two_form_view_2"/>
    <field name="view_mode">form</field>
    <field name="sequence">3</field>
</record>
Unfortunately the view_ids option will ignore the view_mode option of the ir.actions.act_window model. So the code <field name=”view_mode”>kanban,tree,form</field> above will become useless. The ir.actions.act_window.view with the smallest sequence will be rendered first. Even if we write the view_mode option as tree,form, Odoo will still render the kanban view.
The next field from the ir.actions.act_window model that can be used to configure the view is the search_view_id field. This field is used to set which search view will be used to filter the data. For example, let’s add 2 search views for the model.two above.
<record id="model_two_search_view_1" model="ir.ui.view">
    <field name="name">model_two_search_view_1</field>
    <field name="model">model.two</field>
    <field name="priority">1</field>
    <field name="arch" type="xml">
        <search>
            <field name="name" />
            <filter string="New" domain="[('status','=','new')]" name="status_new"/>
        </search>
    </field>
</record>

<record id="model_two_search_view_2" model="ir.ui.view">
    <field name="name">model_two_search_view_2</field>
    <field name="model">model.two</field>
    <field name="priority">2</field>
    <field name="arch" type="xml">
        <search>
            <field name="name" />
            <filter string="Confirmed" domain="[('status','=','confirmed')]" name="status_confirmed"/>
            <filter string="Closed" domain="[('status','=','closed')]" name="status_closed"/>
            <group expand="0" string="Group By">
                <filter string="Status" name="group_bystatus" domain="[]" context="{'group_by': 'status'}"/>
            </group>
        </search>
    </field>
</record>
If we want to use the search view with the id of model_two_search_view_2, we can write a code like below.
<record id="action_model_two_with_search_view" model="ir.actions.act_window">
    <field name="res_model">model.two</field>
    <field name="search_view_id" ref="model_two_search_view_2" />
</record>
How to restrict the data with ir.actions.act_window
We can restrict the data that will be displayed with some fields that have been provided by ir.actions.act_window model. The first is the domain field. Here is the example.
<record id="action_model_two_limit_record_with_domain" model="ir.actions.act_window">
    <field name="res_model">model.two</field>
    <field name="domain">[('status','=','confirmed')]</field>
</record>
With the domain field, we can restrict the data that will be displayed to the user. Unfortunately, the user can not undo the restriction from the domain field. From the code above, the user can open the model.two which the status is confirmed only, so the user cannot see the other record/data.
If we want the data to be displayed first is the data which its status is confirmed, but still can see other data, we can use the search_view_id field combined with the context field. Here is the example.
<record id="action_model_two_limit_record_with_search_view_and_context" model="ir.actions.act_window">
    <field name="res_model">model.two</field>
    <field name="search_view_id" ref="model_two_search_view_2" />
    <field name="context">{'search_default_status_confirmed': 1}</field>
</record>
The formula for writing a context to filter the data is the search_default_ text followed by one of the filter names in the search view. In the code above the filter name is the status_confirmed. Please check this filter name in model_two_search_view_2 search view. When the user calls the action window above the status_confirmed filter will be applied automatically, so the displayed data is already filtered.

Furthermore, if the user wants to see other data/records, he/she can remove the Confirmed filter shown in the image above.
In addition, we can also limit the amount of data that will be displayed in the tree/list view per page, by adding the limit field. The default value of this field is 80, so by default, the data that will be displayed will be 80 rows per page. Here is the sample code and how it will look like.
 <record id="action_model_two_limit_record_number" model="ir.actions.act_window">
    <field name="res_model">model.two</field>
    <field name="limit">2</field>
</record>

From the picture above, it can be seen that from the total of 8 records, it is limited to displaying 2 lines only per page.
How to set the default values
With the context field we can set the default value of a model too. Like the code below.
<record id="action_model_two_with_default_value" model="ir.actions.act_window">
    <field name="res_model">model.two</field>
    <field name="context">{'default_name': 'Automatic filled'}</field>
</record>
If the ir.actions.act_window above is called, then the user clicks the Create button, the name field will contain the Automatic filled words automatically.
How to display a specific record
We can also display a record with certain id/primary key by using the res_id field from the ir.actions.act_window model, so the user can view the data directly, without having to look for it first in the tree or the kanban view. As an example, let’s create a record for the model.two first. Please take a look at the code below.
<record id="model_two_automatic_created" model="model.two">
    <field name="name">Automatic</field>
    <field name="status">confirmed</field>
    <field name="description">Added when install/upgrade the module</field>
</record>
We can display the record above in a form view directly with this code.
<record id="action_model_two_open_specific_record" model="ir.actions.act_window">
    <field name="res_model">model.two</field>
    <field name="view_mode">form</field>
    <field name="res_id" ref="model_two_automatic_created" />
</record>
How to create and call the ir.actions.act_window in python
Now it’s time for us to discuss how to create and call the ir.actions.act_window in python. First, let’s create a new model again.
# -*- coding: utf-8 -*-
from odoo import api, fields, models, exceptions, _

class ModelThree(models.Model):
    _name = 'model.three'
    _description = 'Model Three'

    name = fields.Char()

    def open_model_one(self):
        pass
We will modify the open_model_one method above later, to return the ir.actions.act_window to open the list view of the model.one. Let’s create a form for the model above first and add a button to call the open_model_one method above.
<record id="model_three_form_view" model="ir.ui.view">
    <field name="name">model_three_form_view</field>
    <field name="model">model.three</field>
    <field name="arch" type="xml">
        <form>
            <header>
                <button name="open_model_one" string="Open Model One" type="object" />
            </header>
            <sheet>
                <group>
                    <field name="name" />
                </group>
            </sheet>
        </form>
    </field>
</record>
In python, to use the ir.actions.act_window feature we don’t need to add a record to the database, just return a dictionary which contains information similar to the ir.actions.act_window table/model. Here is the simplest example.
def open_model_one(self):
    return {
        'type': 'ir.actions.act_window',
        'res_model': 'model.one',
        'view_mode': 'tree,form'
    }
The code above is the minimum code to use the ir.actions.act_window feature, if we delete one of the keys from the dictionary above, we will get an error. But it would be nice if we add the name key, so the undefined or unnamed word not appears in the breadcrumb.
def open_model_one(self):
    return {
        'type': 'ir.actions.act_window',
        'name': 'Model One',
        'res_model': 'model.one',
        'view_mode': 'tree,form'
    }
We can write the name, res_model, target, view_mode, domain, context, and limit fields just like when we create an ir.actions.act_window with xml or csv files. Like the code below.
def open_model_two(self):
    return {
        'type': 'ir.actions.act_window',
        'name': 'Model Two',
        'res_model': 'model.two',
        'view_mode': 'tree,form',
        'target': 'fullscreen',
        'domain': [('status','=','new')],
        'context': {'default_name': 'From model three'},
        'limit': 2
    }
As for the res_id and view_id fields, we can write the id of the corresponding record directly. What I mean about the id here is not the id that we write in the xml/csv file, but the id(primary key) in the database. For example, suppose we already know the id of the record we are going to use, then we can write it like this.
def open_model_two_with_specific_id(self):
    return {
        'type': 'ir.actions.act_window',
        'name': 'Model Two',
        'res_model': 'model.two',
        'view_mode': 'form',
        'res_id': 1
    }
Or if we know that the record we are going to use is created with an xml/csv file and know its id, we can write it like this.
def open_model_two_with_specific_id_and_view_id(self):
    return {
        'type': 'ir.actions.act_window',
        'name': 'Model Two',
        'res_model': 'model.two',
        'view_mode': 'form',
        'res_id': self.env.ref('tutorial_action_window.model_two_automatic_created').id,
        'view_id': self.env.ref('tutorial_action_window.model_two_form_view_2').id
    }
Or if we don’t know the id, we can do a search, like in the code below.
def open_model_two_with_id_and_view_id_from_search(self):
    res_id = self.env['model.two'].search([('name','=','test')],limit=1)
    form_view_id = self.env['ir.ui.view'].search([('model','=','model.two'),('type','=','form'),('priority','>',1)], limit=1)

    return {
        'type': 'ir.actions.act_window',
        'name': 'Model Two',
        'res_model': 'model.two',
        'view_mode': 'form',
        'res_id': res_id.id,
        'view_id': form_view_id.id
    }
Unfortunately, we can not use the view_ids field if we use the ir.actions.act_window in python. The view_ids field is replaced with the views field. Here is an example of how to use it.
def open_model_two_with_views_option(self):
    return {
        'type': 'ir.actions.act_window',
        'name': 'Model Two',
        'res_model': 'model.two',
        'views': [
            (self.env.ref('tutorial_action_window.model_two_kanban_view_2').id, 'kanban'),
            (self.env.ref('tutorial_action_window.model_two_tree_view_2').id, 'tree'),
            (self.env.ref('tutorial_action_window.model_two_form_view_2').id, 'form')
        ]
    }
Something different also happens in the search_view_id field, where we have to wrap the id of the search view that we will use in a list, like the code below.
def open_model_two_with_search_view(self):
    return {
        'type': 'ir.actions.act_window',
        'name': 'Model Two',
        'res_model': 'model.two',
        'view_mode': 'tree,form',
        'search_view_id': [self.env.ref('tutorial_action_window.model_two_search_view_2').id]
    }
Now let’s try the ir.actions.act_window which the target field is main. Let’s prepare the method first.
def open_other_record(self):
    res_id = self.env['model.three'].search([('id','!=',self.id)],limit=1)

    return {
        'type': 'ir.actions.act_window',
        'name': 'Model Three',
        'res_model': 'model.three',
        'view_mode': 'form',
        'res_id': res_id.id
    }

def open_other_record_as_main_target(self):
    res_id = self.env['model.three'].search([('id','!=',self.id)],limit=1)

    return {
        'type': 'ir.actions.act_window',
        'name': 'Model Three',
        'res_model': 'model.three',
        'view_mode': 'form',
        'res_id': res_id.id,
        'target': 'main'
    }
Please make sure that the model.three has more than one record. Open one of the record then click the Open Other Record button repeatedly, so the breadcrumb will become very-very long like the image below.

Then click the Open Other Record As Main Target button, in an instant the breadcrumb will be cleaned, so we can’t open the previous record/view.
We can call the ir.actions.act_window which is created with the xml/csv file from python too, here is the example
def open_action_from_xml(self):
    return self.env['ir.actions.act_window']._for_xml_id('tutorial_action_window.action_model_two_open_specific_record')
How to create and call the ir.actions.act_window in javascript
Unfortunately, using the ir.actions.act_window in javascript is a bit more complex. You can ignore it for a while because as an Odoo developer we rarely write the javascript code, please study it if you really need it or are free. I’ll write the tutorial if I have time.
As an information, in order to use the ir.actions.act_window in javascript, we have to call the do_action method on a specific object, please check the Odoo source code here for reference.