

Odoo is a web-based open source ERP software. In one odoo application, there are many modules/addons that you can install as needed. For example, if you need an application for sales transactions, you can install the Sales module, if you need a production application, you can install the Manufacture module, and so on.
Odoo can be installed on many operating systems, such as Linux and Windows. For other operating systems like MacOS, I never doing it, so I can’t be sure if it can or not, because I don’t have it 🙂
In this article, I will discuss how to install odoo on the Windows operating system. I will discuss how to install odoo on the Linux operating system in the next article if I have the opportunity.
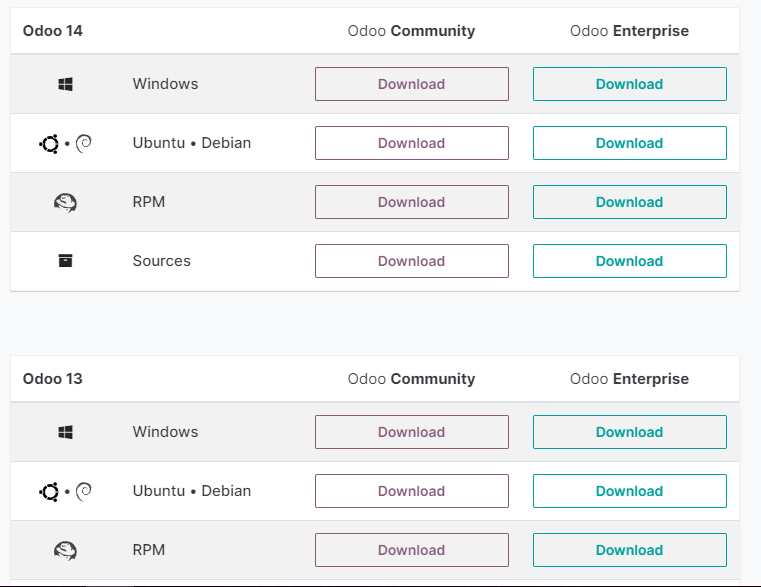
To install odoo on Windows, we have to download the installation file first, so we need to go to the odoo download page that looks like in the image below.

Fill in your personal data in the form that available, if you don’t fill it you can’t download the odoo installation file. But don’t be surprised if odoo asia pacific will contact you by phone or email after a few days. Based on my experience, they will offer a cloud service and a demo database to you.
Then click the download button on the odoo version and the operating system that you want. In this tutorial, I choose the odoo 14 comunity for Windows operating system.
If the download process id completed, double-click the downloaded file to start the installation process.

Select YES when the User Account Control window appears, so that you can continue the installation process. Then select the language, keep using the English so that it looks the same as this article, then click OK. The language on the odoo application can be changed later.

A welcome page will appear, click the Next button.

Then click the I Agree button on the agreement page.

Then select the items that you want to install. Of course, you have to select the Odoo Server option. As for the PostgreSQL Database option, you can choose it or not. If you want to install PostgreSQL manually, of course, you don’t need to choose this option. Or if your operating system has PostgreSQL installed, this option is usually disabled. Just choose for the moment. Then click Next.

The next step is to fill the PostgreSQL connection information. Just leave it as it is then click the Next button, this information can be changed at any time after the odoo installation process is complete by changing the odoo.conf file.

In the next step we have to choose the location where odoo will be installed. Click the Browse button to select the location that you want. My advice, make a folder that contains information about the current version of odoo that you install, just in case if one day you will install odoo with another version, so that you are not confused.

When you click the Install button, the installation process will start immediately, odoo will start copying the needed files to your odoo installation location, wait for it to finish.

After the file copying process is complete, odoo will start downloading the PostgreSQL.

Wait for it to finish. Depending on your internet speed, this process may take some time. On my computer, this process can take up to 30 minutes. During the PostgreSQL download and installation process, the Back, Next, and Cancel buttons will be disabled. After the PostgreSQL download and installation process is complete, the Next button will become clickable again, click the button, a completed window will appear.

Leave the Start Odoo checkbox checked, then click the Finish button, the odoo application will immediately be opened in your default browser, as shown below.

Congratulations !!! you have successfully installed the odoo ERP software on your Windows machine. Now it is time to create a database to try the odoo’s features.
You need to know, when we create, delete, duplicate, and back up a database, odoo will ask us to enter a password, which is commonly referred to as Master Password. On odoo 13 and 14, odoo will automatically generate a random password, which looks like in the picture above. You must remember or write down the password on your note. Or, before creating your first database, you must replace the random password with the password that you like. To do this, simply delete the password in the Master Password field, then replace it with the new password that you want. Like in the image below.

After that you can immediately create your first database. On odoo 12 and below, odoo does not generate a random master password. By default on odoo 12 and below the master password is ‘admin’, unless you have changed it.
To create a database, fill the Database Name field with the name that you want. Then fill the Email and Password fields with the username and password that you will use to log in to the database. Other fields are optional, you can fill it or not.

Click the Create Database button and wait for it to finish. After the database creation process is complete you will be redirected to the Apps menu so that you can install your first application/module/addon.

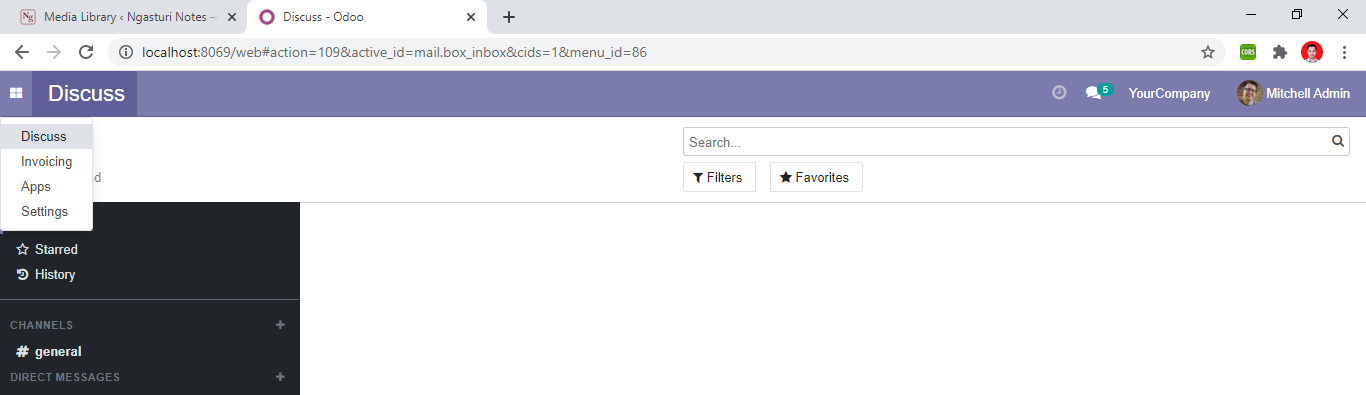
Click the Install button on one of the application/module/addon, like the Invoicing addon. After the installation process is complete, at odoo community you will be redirected to the Discuss menu. Click the button on the top left corner of odoo navbar, the Invoicing menu or the menu of the application/module/addon that you install should be there. Click the menu to start trying out its features.

Now it’s time for you to explore odoo’s features. Please install some applications/modules/addons and try their features.
Here are a few things you should know when using odoo.
Turning off and turning on the Odoo Service
We can turn off and turn on the odoo service via the Task Manager. The trick is to press the CTRL + ALT + DEL keys on your keyboard, so you can enter the Task Manager. Or search via the Windows Start button.

In the Task Manager application, open the Service tab then find the odoo service. Right click on the service, then select Stop to turn it off, so that the odoo application on your computer becomes inaccessible. Select Start to run the odoo service again, so that the odoo application on your computer can be accessed again. Or click Restart to perform the Stop and Start commands at once. Knowing how to turn off and to turn on the odoo service is very important, because many actions require this process to be executed, such as adding a new application/module/addon.

Enter Debug Mode
When you log in to odoo, not all menus can be seen. Some menus are only visible in debug mode. This is the appearance of the Apps menu when opened not in debug mode.
Click the Settings menu, then at the very bottom of the form click the Activate the developer mode.

The browser will refresh, return to the Apps menu, now some menus that previously did not exist have appeared.

Adding Applications/Modules/Addons
In the default installation, odoo already has many applications. But sometimes there are some features that we need are not available, so we have to install applications/modules/addons from third parties. Sometimes we even have to create our own applications/modules/addons if we don’t find the applications/modules/addons that we need.
Odoo has an Apps Store that provides many applications/modules/addons that we can download for free or paid. As a case study, we will try to download one of the free applications from odoo Apps Store and install it on our Windows computers.
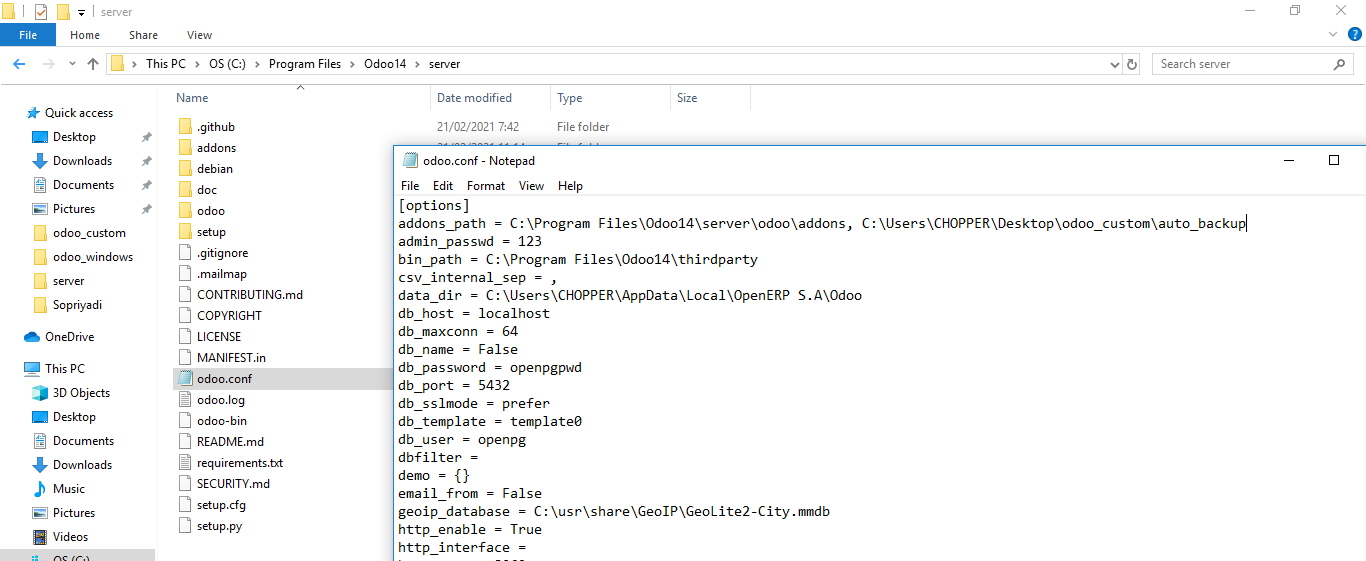
Download the application/module/addon from the link above, then extract it in any folder that you like. On my computer, I put it on the Desktop folder, as shown below.

Find the odoo.conf file in the folder where you install odoo. Edit the file with a text editor, like Notepad, then add the path where you put the application/module/addon that you just downloaded in the addons_path section like in the image below, then save.

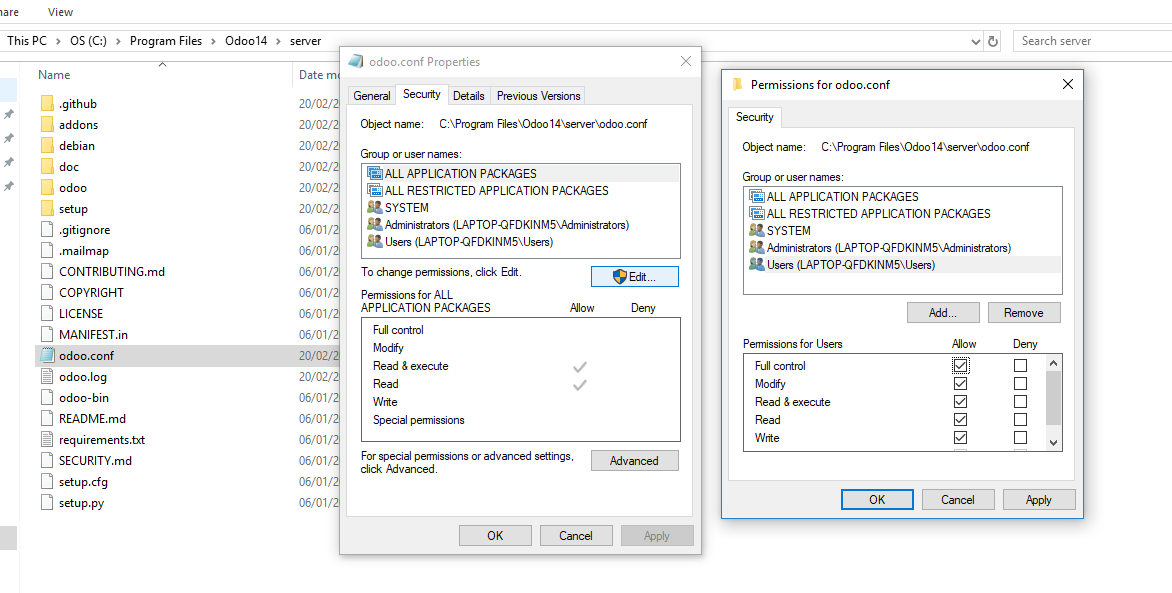
You may need to set the permission before you can modify this file. The trick is to do the right click on the file then select Properties. On the Security tab, click the Edit button. Select Users in the Group or user names section, then in the Permission for Users section select Full Control then click Apply and OK.
Stop your odoo service via the Task Manager, then start again. In your browser, enter the debug mode, then enter the Apps menu. Then click the Update Apps List menu, a dialog will appear, click the Update button in the dialog then wait for the process to finish. Search the application/module/addon that you just downloaded in the apps menu as shown below, make sure that the application/module/addon is recognized by odoo, so you can install it immediately.

Change the Master Password
You can change the master password of your odoo application by accessing the http://localhost:8069/web/database/manager then click the Set Master Password button. But, you must enter the old Master Password to create a new Master Password. Then what if we forget the old Master Password?
Don’t worry, you can change the Master Password directly in the odoo.conf file in the admin_passwd section. Replace the contents of that section which is unreadable text with any text that you want as the new Master Password, for example the ‘123’, as shown below. Then restart your odoo service via Task Manager.
The ‘123’ master password as shown above can be directly used to create, delete, duplicate, and backup the databases. Or if you want to be more secure, so that the master password is stored in unreadable text again, go to the http://localhost:8069/web/database/manager then change the Master Password by clicking the Set Master Password button as shown below.

Changing the Port
By default, you can access odoo at the http://localhost:8069/ URL, if you have more than one odoo application on one computer or there is another application that uses the 8069 port, you are advised to change the port number to another unused port in the odoo.conf file in the http_port section, then restart your odoo service . With this, you can access your odoo application on the port that you like, and not run into conflicts with other applications.
One Reply on “How to Install Odoo on Windows”
Waw turns out there’s a simple way.
I always do this with git clone, setup py env, and install pg and create role